

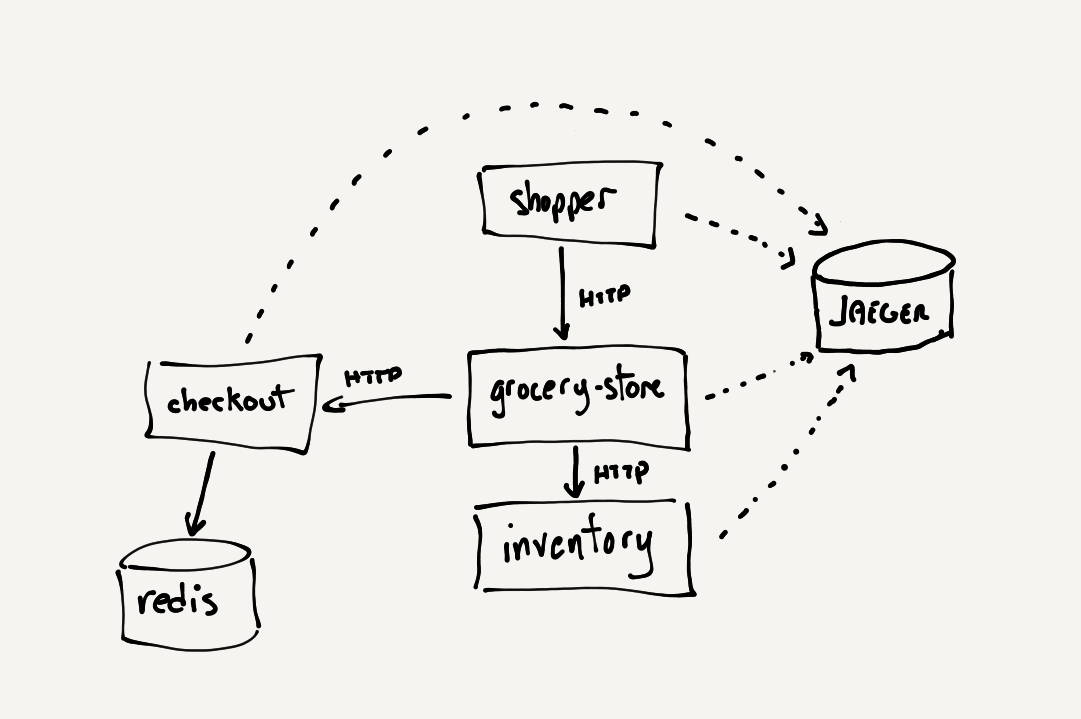
A grocery store isn’t much of a store if there’s no way to buy anything. After visiting Python in part 1 and Go in part 2, it’s time to visit Java in part of the practical OpenTelemetry series. In this post we’ll add the beginnings of an order processing system to our grocery store. This new service, the checkout will receive a POST request over HTTP and place an order job in a Redis message queue, which will be picked up by a future service. Using a Docker container, let’s start by setting up redis locally, the same way we launched the Jaeger backend in part 1. Run the following command in a terminal:
1
docker run --name redis --rm -p 6379:6379 redis:6.2
Note that Redis is accessed on port 6379. If things went smoothly, the following message should appear:
1
2
3
...
1:M 18 Mar 2021 17:08:44.224 # Server initialized
1:M 18 Mar 2021 17:08:44.224 * Ready to accept connections
Let’s test the redis port and make sure we can connect to it. I like using netcat to test whether ports are accessible or not. The following command sends the redis command hkeys * to the port via nc:
1
2
3
echo 'hkeys *' | nc -v localhost 6379
Connection to localhost port 6379 [tcp/*] succeeded!
*0
The succeded message tells us we successfully connected to the port, and *0 is redis’ response to the command we passed in. So far so good.
Checkout service
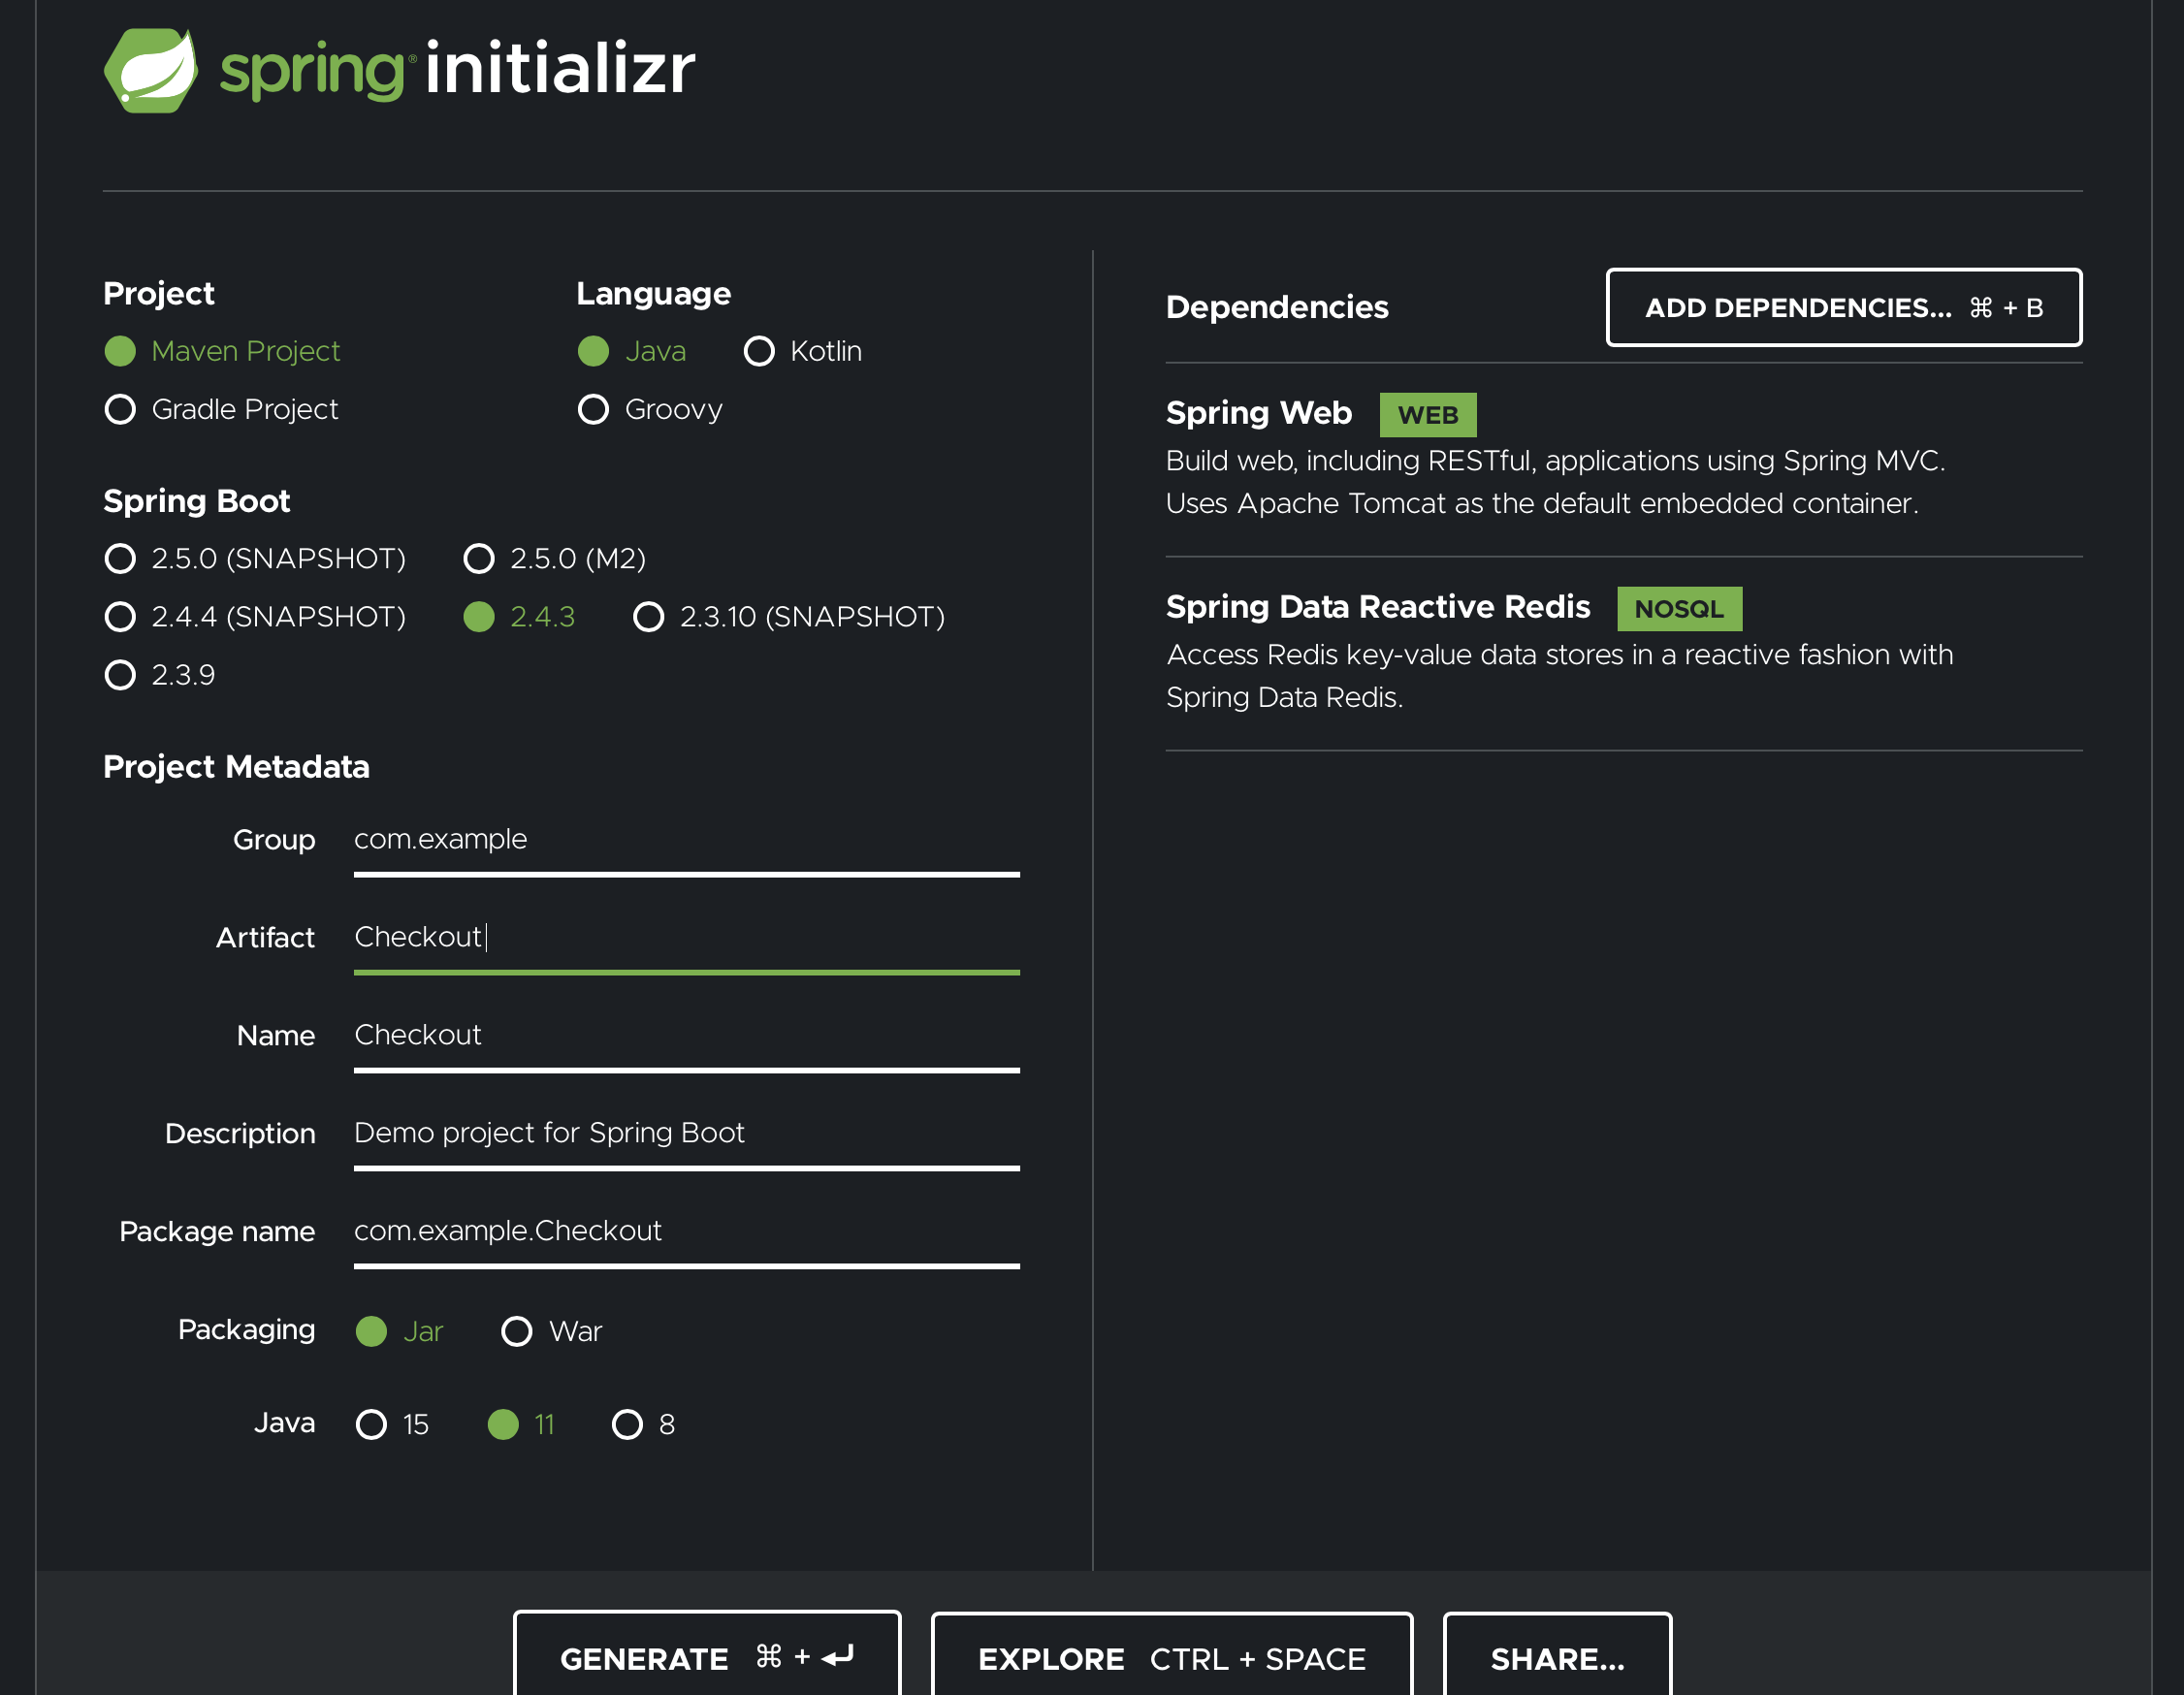
Not having touched Java in some time, I decided to use Spring for the web application and the Spring Initializer to get started. I updated my app’s name, added the Spring Web and Spring Data Reactive Redis dependencies and clicked the Generate button.
The source code was then downloaded and added to the codeboten/practical-otel repo. In order to receive a request to our app, let’s add a RestController that will accept POST requests to the following URL /orders:
1
2
3
4
5
6
7
8
9
10
11
12
13
14
15
16
17
18
19
20
21
22
23
24
25
26
27
28
29
30
31
32
33
34
35
36
package com.example.checkout;

import org.springframework.beans.factory.annotation.Autowired;
import org.springframework.context.ApplicationContext;

import org.springframework.data.redis.core.StringRedisTemplate;
import org.springframework.data.redis.serializer.Jackson2JsonRedisSerializer;
import org.springframework.web.bind.annotation.PostMapping;
import org.springframework.web.bind.annotation.RequestBody;
import org.springframework.web.bind.annotation.RestController;

@RestController
public class CheckoutController {

    @Autowired
    private ApplicationContext context;

    String serializeOrder(Order order) {
        Jackson2JsonRedisSerializer<Order> serializer = new Jackson2JsonRedisSerializer<>(Order.class);
        return new String(serializer.serialize(order));
    }

    void sendMessage(String message) {
        StringRedisTemplate template = context.getBean(StringRedisTemplate.class);
        template.convertAndSend("orders", message);
    }

    @PostMapping("/orders")
    Order newOrder(@RequestBody Order newOrder) {
        Order order = new Order();
        order.setItems(newOrder.getItems());
        String serializedOrder = serializeOrder(order);
        sendMessage(serializedOrder);
        return order;
    }
}
You can see that newOrder receives an Order from the RequestBody, serializes it to a JSON string which it then sends to Redis. We’re keeping the models pretty minimal as well:
1
2
3
4
5
6
7
8
9
10
11
12
13
14
15
16
17
18
19
20
21
22
23
24
25
26
27
28
29
30
// Order.java
package com.example.checkout;

import java.util.List;
import java.util.UUID;

public class Order {
    public String id;
    public List<LineItem> items;

    public Order() {
        id = UUID.randomUUID().toString();
    }

    public List<LineItem> getItems() {
        return items;
    }

    public void setItems(List<LineItem> items) {
        this.items = items;
    }
}

// LineItem.java
package com.example.checkout;

public class LineItem {
    public String id;
    public int quantity;
}
Once that’s all done, let’s build our JAR by running the following command to compile the application:
1
2
git clone https://github.com/codeboten/practical-otel.git && cd ./practical-otel/part3/Checkout
./mvnw clean package spring-boot:repackage
Auto Instrumentation
The Java instrumentation community provides a mechanism that automatically instruments various libraries by leveraging a single JAR. For the first part of our example, let’s use this to get some traces. First let’s download the opentelemetry-javaagent-all.jar:
1
wget https://github.com/open-telemetry/opentelemetry-java-instrumentation/releases/download/v1.0.0/opentelemetry-javaagent-all.jar
You can find the latest releases on the community’s repository in GitHub. The Java agent supports configuring a variety of useful options, like the exporter and resource attributes via application properties which can be set via the command line. Note I’m setting a service.name as well as the jaeger exporter this way, pretty convenient! By default Spring will run on port 8080, but we already have the inventory service running on that port, so we’ll use 8083 instead:
1
2
3
4
5
6
7
8
wget https://github.com/open-telemetry/opentelemetry-java-instrumentation/releases/download/v1.0.0/opentelemetry-javaagent-all.jar

java -javaagent:./opentelemetry-javaagent-all.jar \
     -Dserver.port=8083 \
     -Dotel.resource.attributes=service.name=checkout \
     -Dotel.traces.exporter=jaeger \
     -Dotel.metrics.exporter=none \
     -jar ./target/Checkout-0.0.1-SNAPSHOT.jar
If all that went well, we should see Spring starting and the application is ready to go:
1
2
2021-03-18 10:38:56.211  INFO 88326 --- [           main] o.s.b.w.embedded.tomcat.TomcatWebServer  : Tomcat started on port(s): 8083 (http) with context path ''
2021-03-18 10:38:56.221  INFO 88326 --- [           main] c.example.Checkout.CheckoutApplication   : Started CheckoutApplication in 3.271 seconds (JVM running for 4.91)
Now let’s update grocery_store.py to provide a new endpoint that sends a set order to the checkout service. We’ll add a front end in a future Practical OpenTelemetry article, so for now we just hardcode the order in the request:
1
2
3
4
5
6
7
8
9
10
11
12
13
14
15
# grocery_store_server.py
# ...
@app.route("/checkout")
def checkout():
    checkout_service = os.environ.get(
        "CHECKOUT_SERVICE_URL", "http://localhost:8083/orders"
    )
    order = {
        "items": [
            {"id": "1", "quantity": 10},
            {"id": "2", "quantity": 20},
        ],
    }
    res = requests.post(checkout_service, json=order)
    return res.text
We’ll also add another request to the bottom of shopper.py to call the new checkout functionality:
1
2
3
4
# shopper.py
# ...
    res = requests.get("http://localhost:5000/checkout")
    print(res.text)
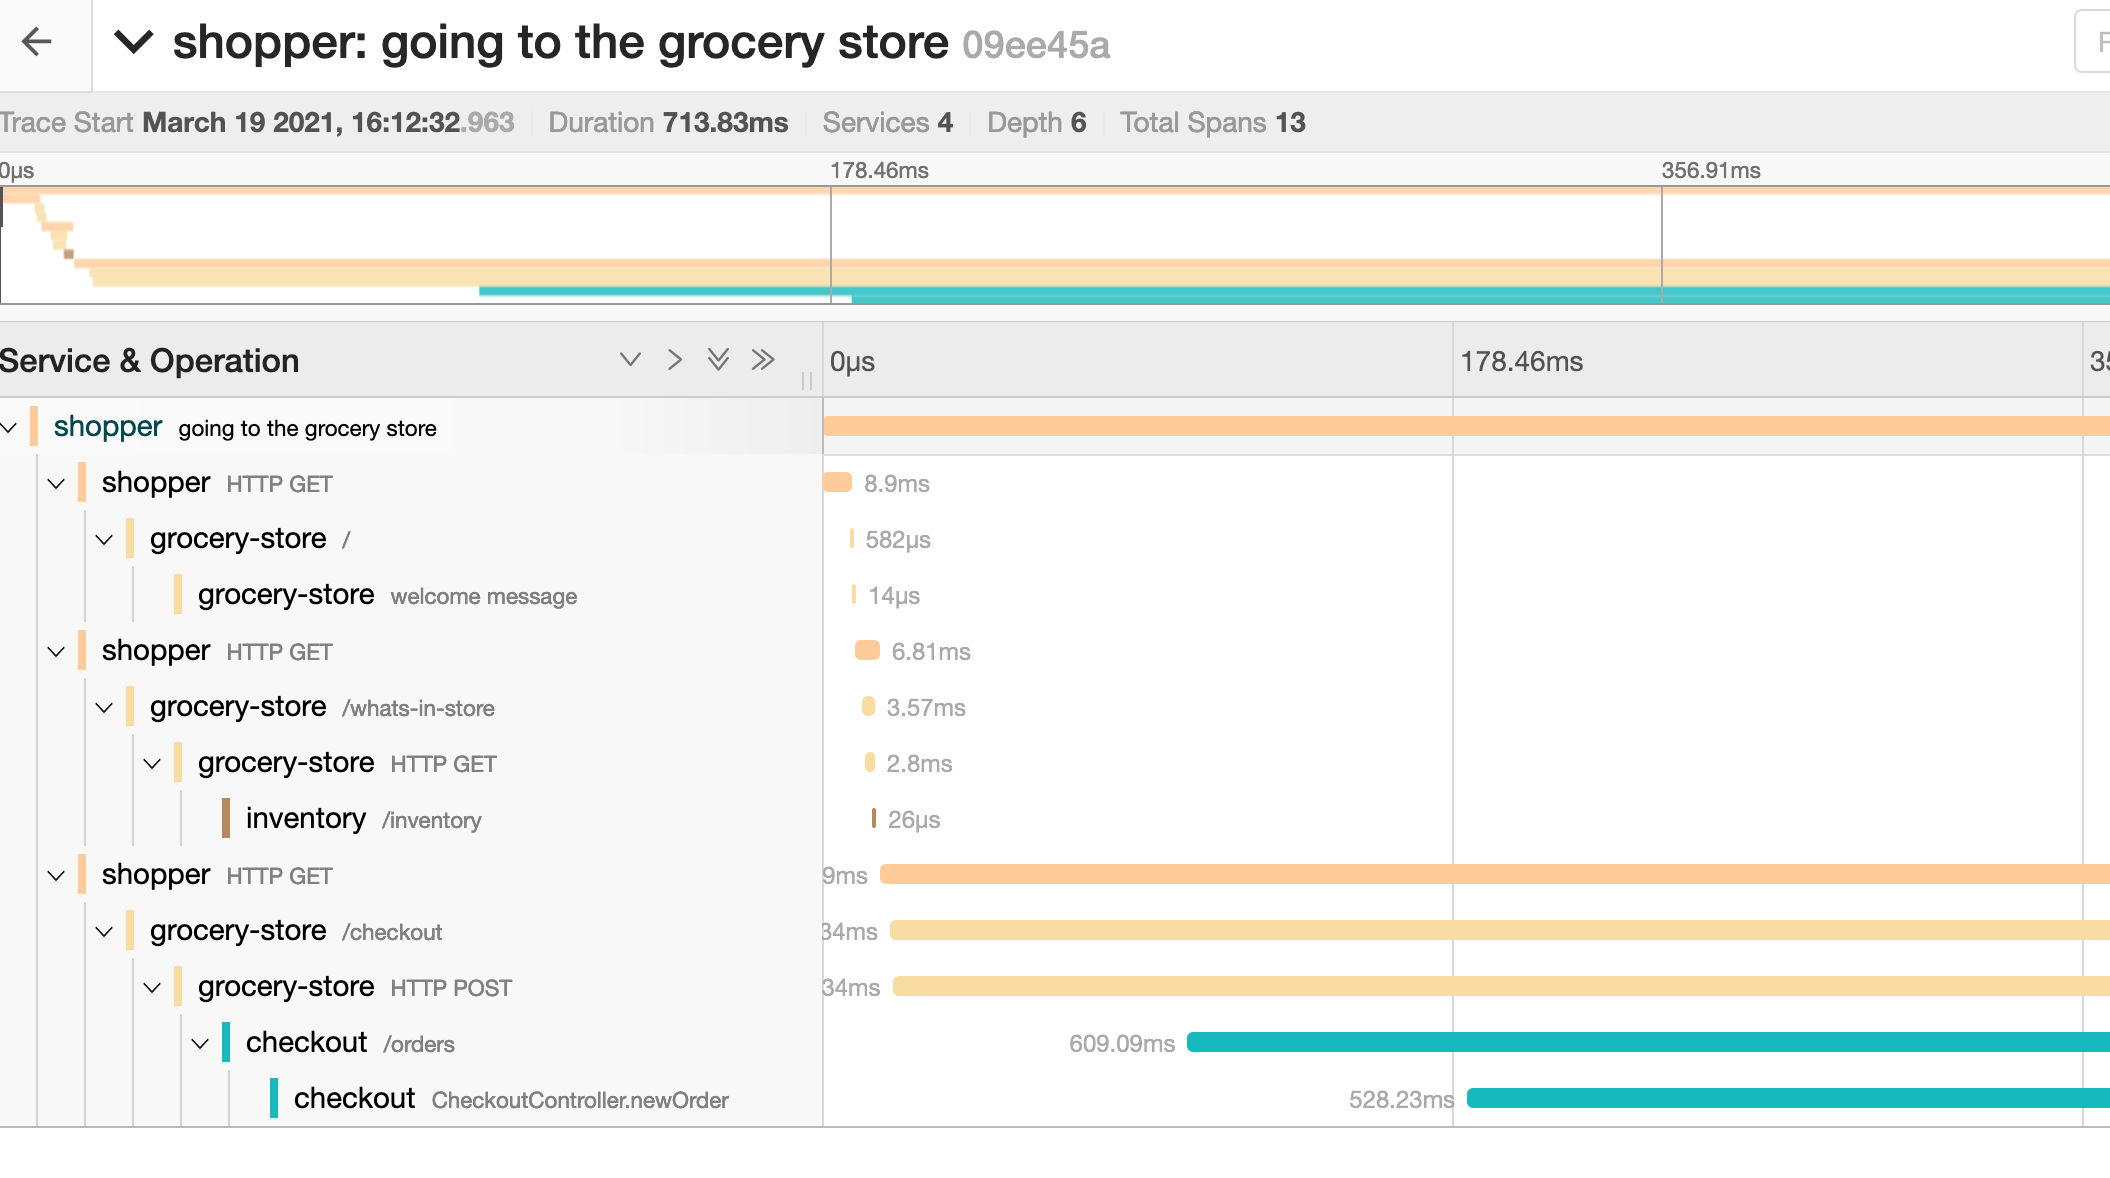
Next time we run the shopper and look at the traces, we should now see a new service in the trace:
1
python ./part2/shopper.py
Manual instrumentation
Auto instrumentation is great, but it’s really just a starting point. Luckily, we can combine manual instrumentation with the automatic instrumentation to get even more details about what our application is doing. Let’s add some manual traces! Let’s update pom.xml to add a dependency for the OpenTelemetry api:
1
2
3
4
5
6
7
8
9
10
		<dependency>
		<groupId>io.opentelemetry</groupId>
			<artifactId>opentelemetry-api</artifactId>
			<version>1.0.0</version>
		</dependency>
		<dependency>
			<groupId>io.opentelemetry</groupId>
			<artifactId>opentelemetry-extension-annotations</artifactId>
			<version>1.0.0</version>
		</dependency>
In the code, we can use the WithSpan annotation on the methods we want to add spans for. In our example app, it could be useful to have a span for the serialization and redis operations, in case something goes wrong, so let’s add them now:
1
2
3
4
5
6
7
8
9
10
// CheckoutController.java
...
import io.opentelemetry.extension.annotations.WithSpan;
...
    @WithSpan
    String serializeOrder(Order order) {
...
    @WithSpan
    void sendMessage(String message) {
...
The last of code we’ll add is an attribute to our span to track the order-id, this could be helpful if a particular order didn’t go through or if a customer calls to ask what happened. We can use the OpenTelemetry API to do this:
1
2
3
4
5
6
7
8
9
// CheckoutController.java
...
import io.opentelemetry.api.trace.Span;
...
    @WithSpan
    String serializeOrder(Order order) {
				Span span = Span.current();
        span.setAttribute("order-id", order.id);
...
Recompile the code and let’s see what this looks like once we put a new request through:
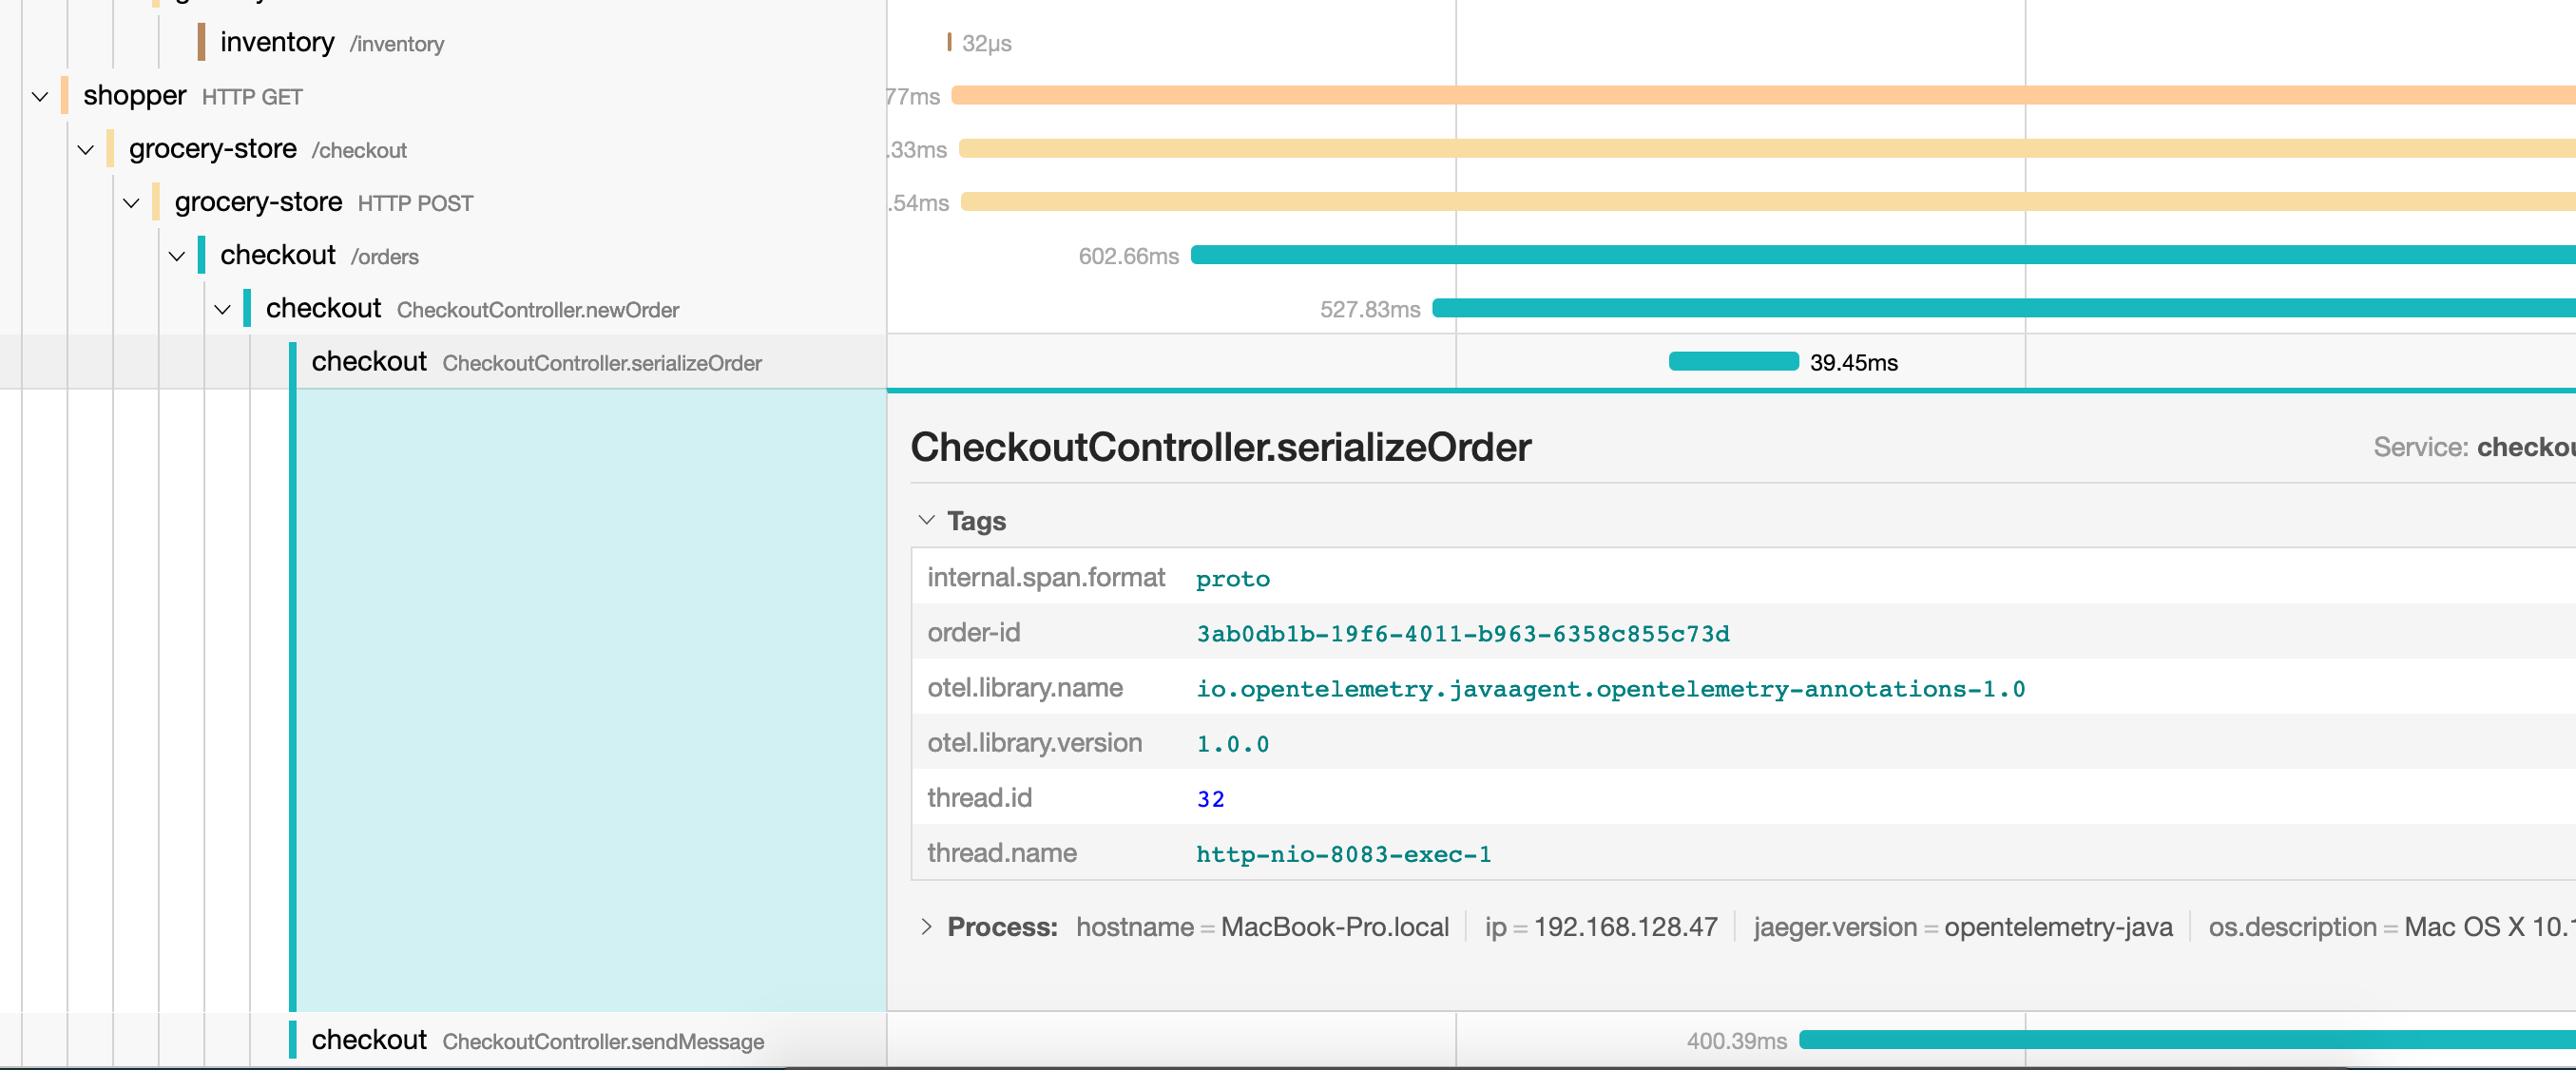
Looking through the new trace, there’s a new span for each method we add instrumentation for and now there’s even an order-id attribute on the serializeOrder span! We managed to build a sample Spring app, instrument it automatically with Java auto instrumentation and now we can augment the tracing data to better suit our specific needs! As always, the full example is available in the Practical OpenTelemetry repo.
Photo by Pawel Nolbert on Unsplash
